First came debit cards you could swipe like a credit card. Then came cash-transferring services like PayPal and Venmo. That led to the near extinction of the paper check.
But it’s still critical to know how to write a check. Some companies, individuals, and organizations still prefer them. For example, many property owners still ask for rent checks because of the paper trail they leave and the fees associated with accepting credit and debit cards.
Fortunately, writing a check is simple once you understand how it works.
How to Write a Check
Writing a check is as simple as following straightforward steps. You can do them in any order you like so long as all the required information is there. But most people move from top to bottom when filling in the required blanks.
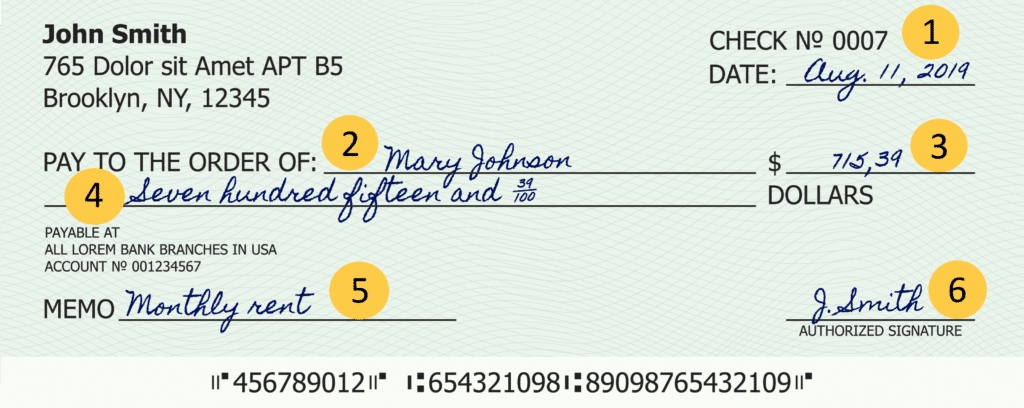
1. Write the Date
Every check needs a date. Without one, the bank won’t accept it. Write today’s date on the date line on the top right-hand corner of the check. You can use any format you like for the date so long as it’s universally recognized in the country you’re in. For example, in the United States, you can write September 30, 2021; Sept. 30, 2021; or 9/30/2021.
It’s best to avoid date formats used primarily in other countries, especially if you’re using the slashes. For example, in Britain, they swap the month and date order, which could lead to confusion in the U.S.
2. Write the Recipient’s Name
Write the recipient’s legal first and last name on the line after the words “Pay to the Order of” — no nicknames or abbreviations.
If you’re writing a check to multiple parties, separate them by an “and” if both parties must be present to cash the check or an “or” if only one party must be present to cash the check. Never use other characters, like a slash or dash, as the bank teller may misinterpret its meaning.
If writing the check to a company, write the company’s preferred name on this line (don’t include the personal names of employees unless they ask you to).
3. Add the Dollar Amount
In the dollar amount box, write the amount of the check numerically. For example, “$5.75.” Always write the first number as close to the left edge of the box as possible and fill as much of the box as possible to prevent the payee from changing the check amount. You can draw a straight or squiggly line after the last numeral to the end of the box if you need to.
4. Spell Out the Dollar Amount
Spell out the dollar amount textually with the cents expressed as a fraction on the dollar amount line. For example, on a check for $150.50, you would write, “One-hundred fifty and 50/100.” Try to fill the entire line with your amount and fill any open space with a straight or squiggly line.
5. Add Any Notes
Write any notes related to the check, including the service date, what you wrote the check for, or an account number on the memo line, which may also be labeled “Note” or “For.” It’s OK to leave this section blank, but it’s best to add something to jog your memory later, let the cashing entity know what the payment applies to, or protect yourself from claims of nonpayment.
For example, the service date may be suitable for a recurring service you pay periodically, like a monthly landscaping service. That allows you to easily track what period that check was for in case there’s a dispute over your account being behind on payments.
And writing the account number of the service you’re paying, such as your cable service or electricity account number, lets the company know what account to apply the payment to if the check gets separated from the payment stub.
Writing what the check was for is another paper trail that allows you to track what you purchased. This way, if the person you paid claimed the check was for a different item, you have proof the check was for the correct item.
6. Sign the Check
It’s essential to know how to sign a check properly. Sign your full name on the check’s signature line. Use the same signature and the exact spelling of your name as the bank has on record.
For example, if your checking account is under the name “John M. Hancock,” you must sign the check “John M. Hancock.”
How to Enter the Check in Your Register
After completing the check, immediately enter the check details into your check register for tracking and balancing purposes. The check register is the spreadsheet-like booklet that comes with your checks. It includes all the same columns as your check with rows for entering individual check data.
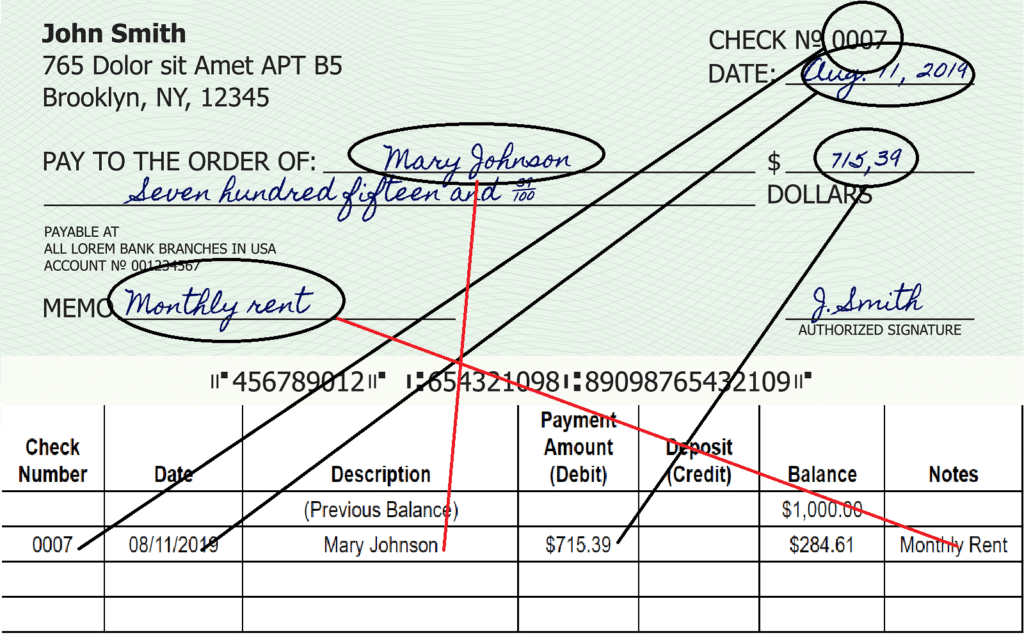
Enter the Check Number
In the first blank row, enter the check number from the check you just wrote into the column labeled “Check Number” or just “No.”
Enter the Date
Enter the date you wrote the check in the date column. The column is very small, so it’s best to use numerals with a slash between them, such as 9/30, omitting the year.
Enter the Check Description
The space to the right of the check number and date columns is the longer description column. Write who you wrote the check to in this space.
Add the Check Amount
To the right of your description is a column labeled “Payment” or “Amount.” Write the dollar amount of the check numerically. When the check clears your bank account, place a checkmark in the small box next to the payment amount.
Balance the Book
The far-right column is the balance area. Subtract the check amount from your bank account’s balance and write that amount in this space. That number is your new account balance. For example, if your checking account balance was $500 and you wrote a $250 check, you’d write “$250” in this space.
Enter Any Notes
Some check registers also have a memo line. If so, use it to record any crucial information about the check, such as what month of service that check paid or the account number for the service. For example, you might write “September electricity payment, account #903207204.”
How to Read a Check
Checks have multiple preprinted sections a check writer must be aware of. Understanding what information they contain can be helpful when trying to provide account information for bill payment or direct deposit.
Account Holder’s Name and Address
On the top-left corner of the check is a section that contains the account holder’s name and address.
Some people have the check printing company add their phone number, date of birth, or driver’s license number because many retailers ask for that information to confirm your identity. That’s not a good idea, as it makes merchants less likely to check that it’s really you.
Check Number
On the top-right corner of the check is a short series of numbers, typically four digits. That’s the check number, which the check writer can use to track the check if there is an issue.
Check numbers rarely start at number one. Instead, when you get a new checking account with a new checkbook, the check numbers usually begin in the hundreds or thousands.
You can also find the check number at the bottom of the check, either between the routing and account numbers or to the right of the account number.
Routing Number
There’s a series of computer-generated numbers under the memo line. Stuffed between two symbols and next to the check number and account number is the nine-digit American Banking Association routing number.
Computerized check readers use the routing number to ascertain the check’s origin bank. Each bank’s routing number is unique, though large national or multinational banks like Wells Fargo may have more than one.
Account Number
The checking account number is the set of computer-generated numbers to the right of the routing number. A computerized check reader combines these numbers with the routing number to know what account within a specific bank the check is from.
Remember, the short number string next to the account number is the check number. It isn’t part of the account number.
Check Security
When writing a check, it’s critical to take steps to ensure a fraudster can’t get ahold of the check and access money in your bank account. These tips can help you avoid this potentially bank-draining check fraud.
Use Permanent Ink
Check scammers can use many tricks to steal your cash, and one of the oldest tricks is check-washing. It’s a process by which criminals intercept checks and chemically remove all the information other than your signature.
If you use a pencil or erasable ink, the criminal’s job is even easier and requires just an eraser.
With just your signature remaining, the criminal has a blank check they can write to themself and take money from your bank account.
Always use permanent blue or black gel-based ink when filling out a check. Gel-based ink traps the color in the paper, making chemical check-washing nearly impossible. Ballpoint pens and markers wash away more easily.
Protect Your Routing and Account Numbers
If a criminal gets their hands on your routing number alone, there’s not much they can do with it. But if they get your routing number and account number, they may as well have your debit card and PIN.
Scammers can easily move cash in and out of your bank account if they have your routing number and account number. What’s worse is these numbers are printed on the bottom of every single check, so you must use care when working with checks.
These tips will help you keep these crucial numbers safe.
Safe Storage
Always store your checkbook in a secure area where no one can get to it, such as in a locked desk drawer or safe. If you must carry it with you, place it in your front pocket or a secure pocket inside your bag.
Send It Securely
It’s not uncommon in today’s digital world to send your routing and account numbers to employers, banks, and other financial institutions through email or messenger for direct deposit and other electronic transactions. While there’s no foolproof way to do so, it’s vital you take as much care as possible by using services with end-to-end encryption.
If you’re messaging these numbers, it’s best to use secure apps like WhatsApp or Viber. These messaging services have the encryption necessary to prevent data theft.
If you’re emailing the numbers, use an encryption service to protect your data. If you choose to skip outside encryption services, some email services have robust built-in encryption, such as Gmail. But encryption isn’t foolproof, so keep an eye out for unexpected transactions in your account.
If encrypted email is impossible, you can save the document as a PDF and encrypt the file or send it as a password-protected file only the recipient has the password for.
Windows users can use AxCrypt, the PCMag 2021 editors’ choice for encryption, while Mac users can use the system’s built-in Preview app to encrypt PDF files.
If the company has a physical office nearby, it’s always safest to deliver these account numbers by hand. Ask if that’s an option before sending them electronically. You can also go old-school and fax or mail the document to the organization.
Entering Bank Account Numbers Online
It’s also common to enter your routing and account numbers online when buying goods or services, but use care when doing so. First, verify the Wi-Fi you’re on is secure. Never transmit this data through an open Wi-Fi network, like at a coffee shop or airport.
Also, verify the site you’re entering the information on is secure by looking for “https” or your browser’s closed padlock at the beginning of the URL. If you’re on an “http” site or the padlock is red or opened, this website isn’t secure, and you should not enter your banking information.
Voiding a Check
If you make a mistake when writing the check or need to cancel the check for any other reason, void it in a manner that prevents anyone from using it.
There are two commonly accepted ways to void a check:
- Write a large “VOID” in blue or black gel ink across the front of the entire check.
- Write “VOID” in blue or black gel ink on the date line, payee line, dollar amount box, dollar amount line, and signature line.
Then, you can safely destroy the check by running it through a paper shredder or burning it.
Exclude Sensitive Information
The memo line allows you to write notes or other information that can tie your check to a specific account within a company.
It’s OK to write your account number with that service, but avoid any personal information like your Social Security number or phone number. It may be tempting if the company you’re paying requires that information, but it can prove troublesome if a criminal intercepts the check.
Check Writing Frequently Asked Questions
Once you know the basics of writing checks and handling them securely, you’re still bound to have some check-related questions come up from time to time. These are the most common.
Can I Write a Check for a Later Date?
If you want the recipient to avoid cashing or depositing the check until a specific date, you can write a later date on the date line. It’s called “postdating” the check. Check your local laws concerning postdated checks, as some states may have specific guidelines or may forbid it outright.
Also, a check becomes legal tender the moment you sign it, and a bank may withdraw the funds from your account before the date you put on the check. A bank isn’t required to honor your postdate. So only use postdated checks with people you know and trust. And never send them to a business, which won’t look before they process the check.
How Do I Fix a Mistake on a Check?
If you make a small mistake, such as misspelling the recipient’s name, you can fix it by crossing out the mistake and rewriting what you intended right after it, then initialing next to the error to indicate you approve the change. If the error is too significant, such as writing the wrong amount, it’s best to void the check altogether and start fresh.
Can I Use a Check to Get Cash?
If you’re writing the check to cash it at the bank, you can write “Cash” on the payee line. That’s called “writing a check to cash.”
You can give a cash check to another party, but some banks have strict policies against cashing these checks. If you lose the check or someone steals it, anyone can cash it.
If your bank takes checks written to cash, you can use them in emergencies, but otherwise, use your ATM card.
Can I Write a Check to Myself?
There’s a safer way to move money between accounts or get cash for yourself in a pinch. Just write the check with your own name on the payee line. You can either cash the check or deposit it into your account.
This option is similar to writing a check to cash. But it’s safer because only you can deposit or cash the check.
Note that even though you made the check out to yourself, you must still follow the bank’s rules for cashing it, such as proper identification.
Why Did the Store Hand Me Back My Check After Scanning It?
The company scanned your check and used the information to create an electronic payment. It no longer needs the check, so it returns the check to you for your records.
Final Word
Writing checks may be a dying payment method, but it’s far from extinct — just endangered. Many organizations and individuals still prefer checks because they’re generally free of the processing fees associated with cards. Checks also provide a clean paper trail from you to the recipient and are free of the dangers involved in entering debit and credit card information online.
So while you may only write a dozen or so checks per year, it’s still a process you should know how to do securely.
If you’re overwhelmed with tracking checks, you can streamline by ordering a checkbook with duplicate checks. Under every check is carbon transfer paper that transfers all the information from the check you just wrote to a duplicate check underneath. That means if you forget to record a check, you can always find the information on the duplicate.